The managers can manage leave for team members and view the leave status of their team members on the Manage Leave dashboard page. The managers can apply the leave on behalf of their subordinates, check leave balances and view transaction details of their team members.
View Leave Details of Team Members
To view the leave dashboard of your subordinates as a manager and to apply leave for your subordinates, you need to:
1. Log in as a Manager.
2. Go to Manage >> Manager services >> Leave.
The Manage leave page appears, as shown in Figure 1
The View leave details tab appears by default displaying the leave status of the team members for the current week. The icon appear for the employees for the day on which the employee is on the approved leave. The dashboard does not show the applied leave status.
The dashboard also displays the closed days and holidays on the dashboard with and
icons respectively.
Filter Leave Records
You can filter the dashboard leave records of your team members on the basis of your role (if you hold any other role i.e HR Manager, Reviewer, HOD or CEO in addition to holding the manager role), custom filters, and Employee fields.
Filter the records by selecting the desired options from the filter fields.
Select your role, any custom filter that you have created, Employee Name or Employee number from Current role, My filters, Manage fields respectively to filter records on the basis of their respective fields.
The dashboard records will be filtered as soon as you select your filter criteria.
Apply Leave for Team members
To apply leave for team members, you need to
1. Log in as a manager and go to Manage leave page by following 1 and 2 steps of View Leave Details and Apply Leave for subordinates process.
2. Click on the – icon for the team member for the day for which you want to apply leave for him/her.
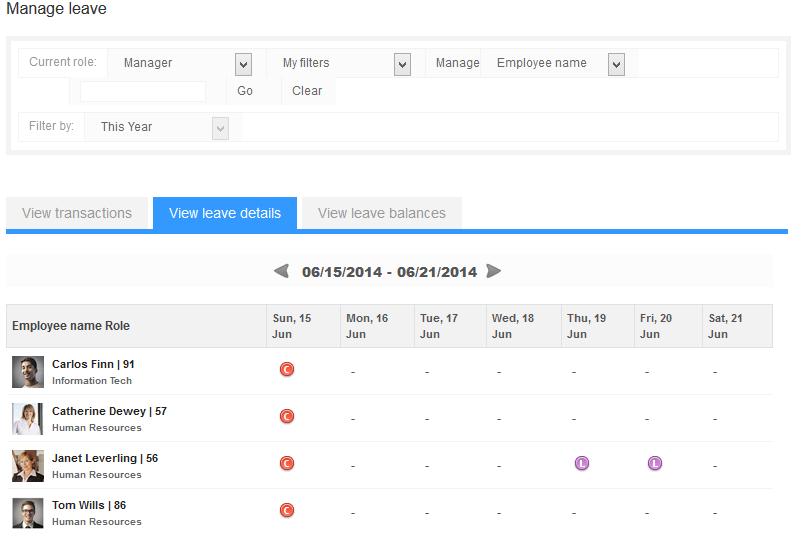
Figure 1
The Apply leave for <Team member name> window appears, as shown in Figure 2.
3. Select the leave type that you want to apply from the Leave type field.
4. Check the leave balance for the selected leave type for the employee (if required) before applying leave.
You can also click on the View availability calendar button to check the availability of other team members of the team during the leave application duration for the team member.
The dates in the Leave duration fields appear selected with the date that you have selected for applying leave.
5. Modify the dates, if required.
6. Provide the reason for the leave in the Reason for leave field and then click Apply.
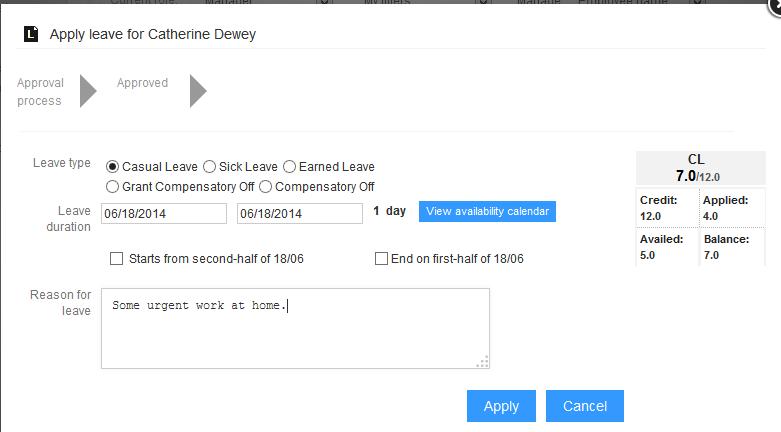
Figure 2
The leave is successfully applied and a message suggesting the same appears, as shown in Figure 3. The leave will be approved as per the workflow selected.
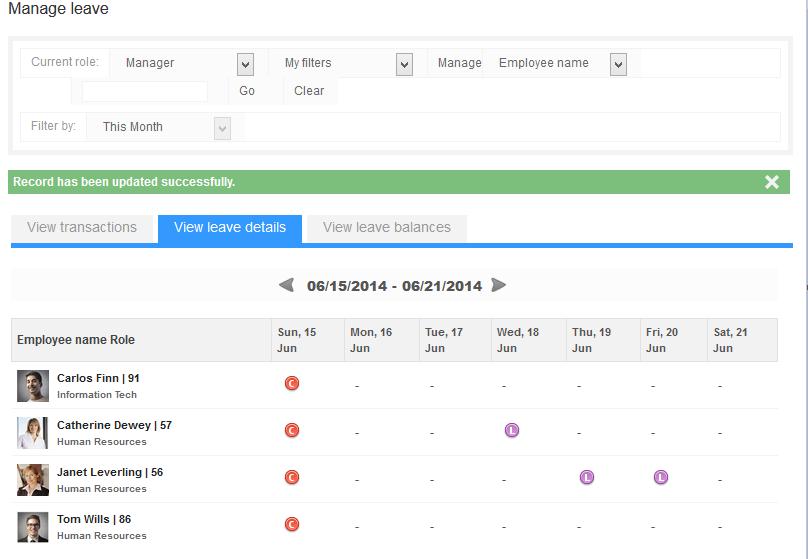
Figure 3
View Leave Transactions of your Team Members
To view leave transactions of your team members, you need to:
1. Log in as a Manager.
2. Go to Manage >> Manager services >> Leave.
The Manage Leave page appears, as shown in Figure 1
3. Click View transactions tab.
The View transactions tab appears, as shown in Figure 4.
The page displays the details of leave transactions that took place for all your team members in the current month for each leave type that is available to the team members.
The leave that are approved and debited from the team member’s leave account appear as links in the Leave type column. You can click on a link to view the corresponding leave details.
The page also allows you to filter the leave transaction records on the basis of month and leave type. You can also view the leave transactions between desired period through custom filter.
- Deselect the leave type for which you do not want to see the leave transactions.
- Select the time duration from Filter by dropdown to view the leave transactions of a different time period.
- Click Go.
The records are filtered as per the filter criteria specified.
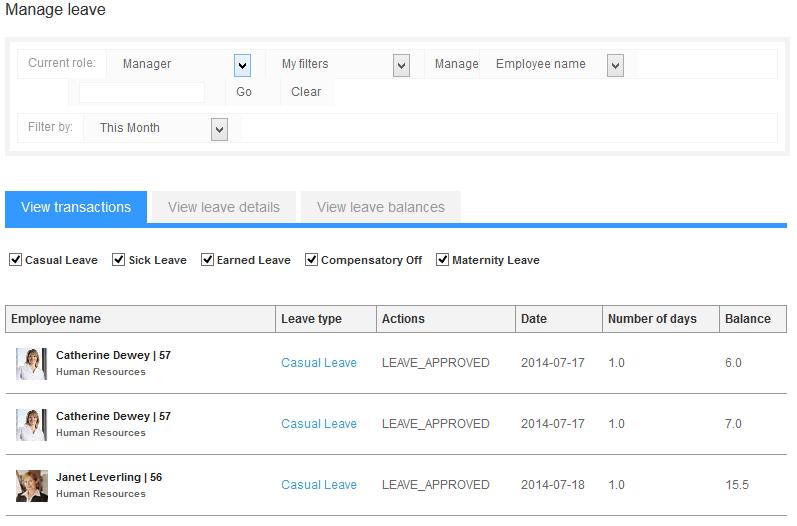
Figure 4
View Leave balances of your team members
To view the leave balances of each leave type for your team members, you need to:
1. Log in as a Manager.
2. Go to Manage >> Manager services >> Leave.
The Manage leave page appears, as shown in Figure 1
3. Click View leave balances tab.
The View leave balances tab appears, as shown in Figure 5.
The page displays the leave balances of all the team members for different types of leave available to them.
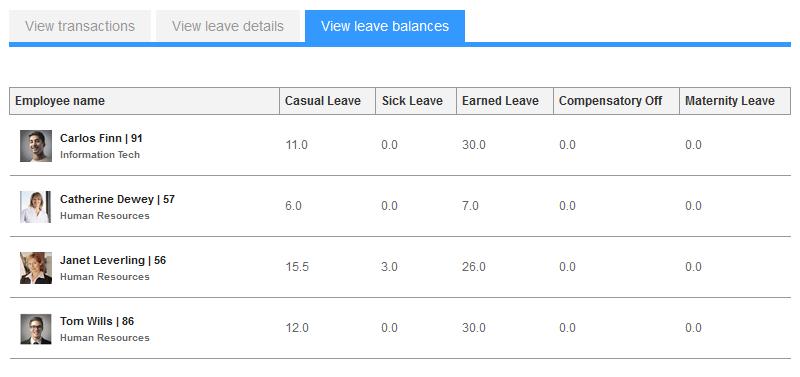
Figure 5
Learn more about Empxtrack Manager Services
Click on the following links to know more about them:


