This help page displays steps on how an employee can view and create goalsheet, and add, modify or delete goals. Empxtrack allows employees to add goals in the goalsheet when it is initiated. A goalsheet may be pre-populated with company or department goals, previous year’s goals or the goals mapped to employee’s job description.
Employees can add new goals to the goalsheet and delete the goals that are not relevant to them. The progress on these goals can be captured and discussed in frequent check-ins.
Note: The steps mentioned below are of Empxtrack Enterprise product.
Follow the steps to view and create goalsheet, and add, modify or delete goals:
- Login to the system as an Employee.
- Go to Message Center or click on the icon
 given on the Icon bar.
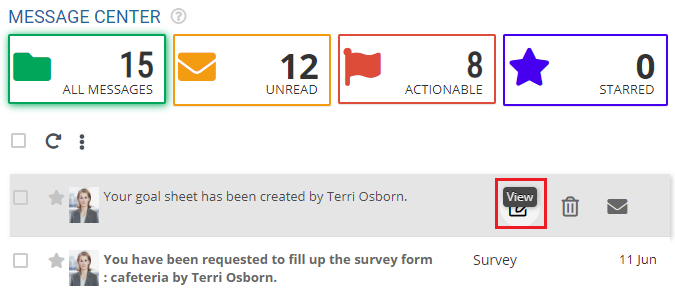
 - Click on the View icon corresponding to the goalsheet initiation message, as shown in Figure 1.

Figure 1
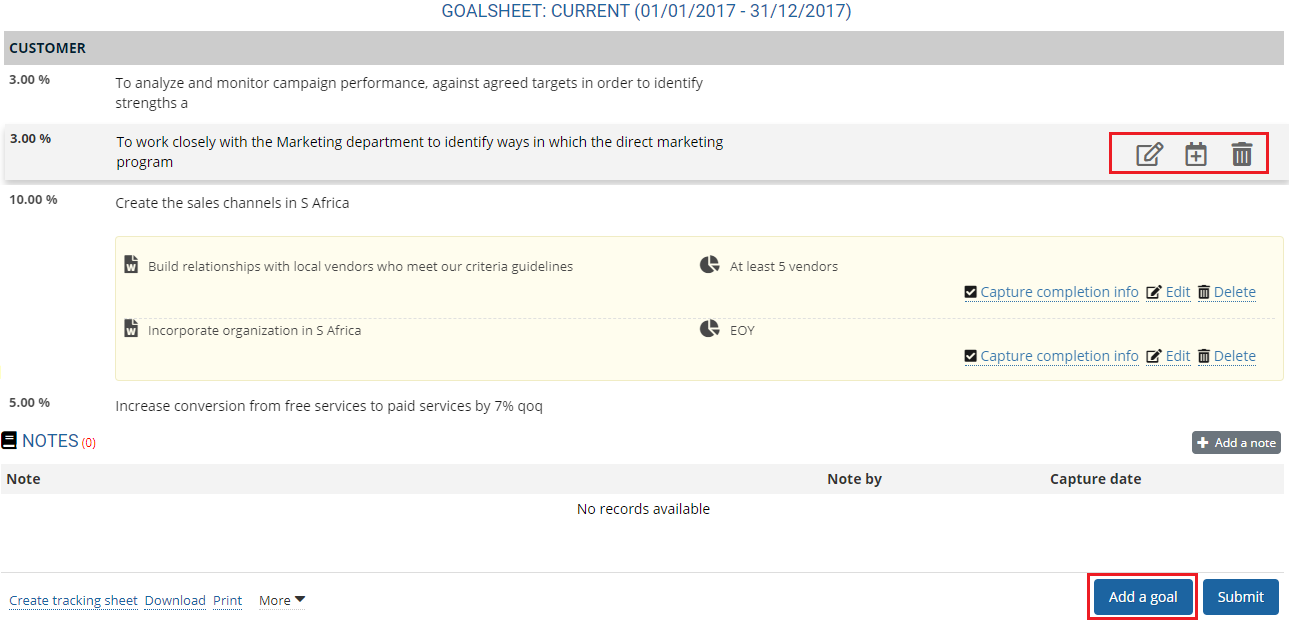
The Goalsheet appears as shown in Figure 2. The goalsheet displays the pre-populated goals (if configured) and allows employee to add more goals to it, and modify or delete existing goals.
Add, Modify or Delete a Goal
4. Delete the goals that you don’t want in your goalsheet by clicking the corresponding Delete icon for a goal and modify a goal by clicking on the corresponding Edit icon.

Figure 2
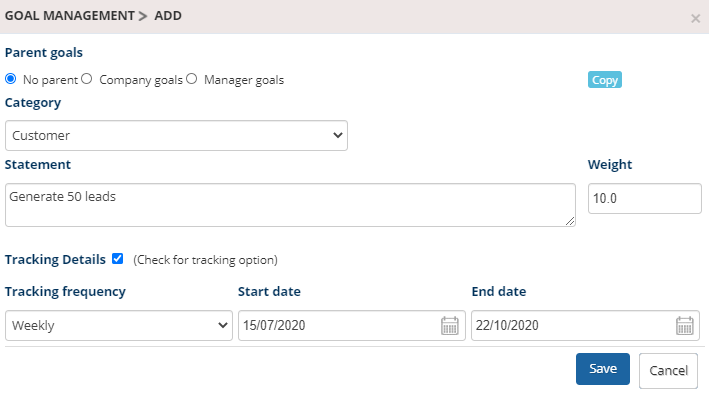
5. Click Add a goal button at the end of the section to add a new goal. The Goal Management > Add page appears as shown in Figure 3.

Figure 3
6. Select the preferred option for Parent goal to associate the goal that you are creating. The parent goals can be the manager’s goals or company’s goals. You can create a child goal of the parent goal or copy the parent goal as is as your goal.
To understand the parent goal, consider your manager is assigned a goal to increase 30% sale. You can now add a goal and use your manager’s goal as your parent goal. You can assign a different weight to the goal as 30% sales increase target may be for the entire team. You may have to increase only 10% sales.
On the other hand, you can copy the parent goal as it is if it is your responsibility to increase the sales by 30%. In such a scenario, the entire goal can be copied as it is with weight and description.
7. Click Copy link to copy the parent goal as it is.
8. Select the category from the Category dropdown.
9. Provide a statement for the goal in the Statement field and the weight of the goal in Weight field. The weight of a goal allows you to find out the relatively important goals. The goals that carry more weight are more important goals as compared to goals that carry less weight.
10. Select the Tracking details checkbox to set goal tracking option for the specific goal. Setup details for Tracking frequency, Start date and End date.
11. Click the Save button.
Add Tasks and Measures
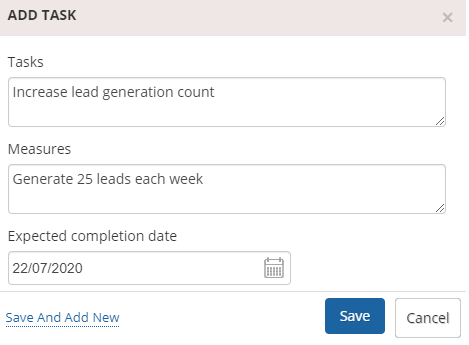
12. To divide a goal into tasks and measures, click the plus sign icon as shown in Figure 2. Add task window appears as shown in Figure 4.

Figure 4
13. Input task and measures in the Tasks and Measures textboxes. Enter an Expected completion date with the help of Calendar controls. Click Save button.
14. Follow the same steps to add more goals. The total weight for all goals in a goalsheet should be 100. If the goalsheet weight is not 100 then you will not be allowed to submit the goalsheet. The goalsheet approval workflow appears at the top of the goalsheet.
15. Submit the goalsheet by clicking Submit button.A confirmation message confirming the submission of the goalsheet informing that you will not be allowed to make any changes to the goalsheet unless it is submitted back to you appears.
16. Click OK. The goalsheet is submitted successfully and a message suggesting the same appears.
Learn more about Empxtrack goal setting and tracking software
Click on any of the following links to know more about them:


