This help page demonstrates steps to configure Request Creation to setup the job request creation form that a recruiter fills while creating a job request. You can use this functionality to show and hide various fields on the form.
To configure request creation page of recruitment module, you need to:
- Log in as an HR Administrator/HR Manager.
- Go to Settings >> Recruitment >> Recruitment configurations. The Settings > Recruitment settings > Applicant tracking configurations page appears with Request Creation tab selected, as shown in Figure 1.
- Select the users who should be allowed to create a job requisition request from Who can create request? field.The available options are:
- Select Roles: Select this option if you want to allow specific user roles to create recruitment requests. Further select the roles who should be allowed to create job requests from the Role column and the workflow that you want to use for that user from the corresponding worflow dropdown under Workflow for request approval column.

Figure 1
- Specific Group of Employees: Select this option if you want to allow the users belonging to a global group to create recruitment requests. Further select the desired global group from the Group of employees with request permissions column and the worflow to be used for the users to create a job request from Workflow for approval dropdown.

Figure 2
- Select Roles: Select this option if you want to allow specific user roles to create recruitment requests. Further select the roles who should be allowed to create job requests from the Role column and the workflow that you want to use for that user from the corresponding worflow dropdown under Workflow for request approval column.
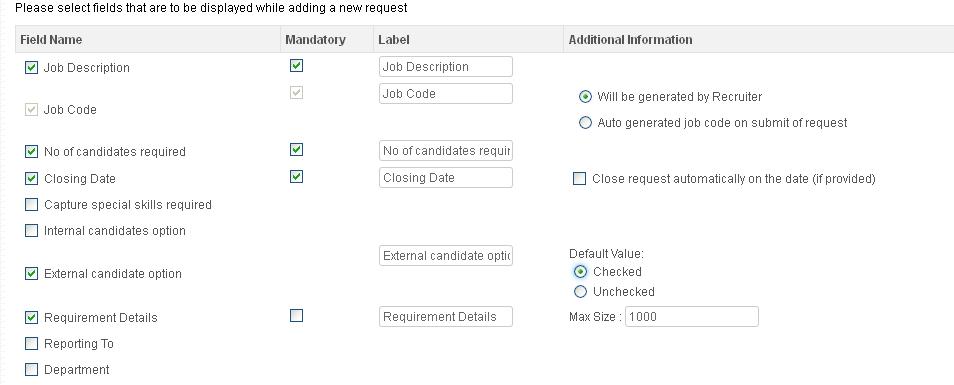
- Select the fields that you want to display to the users while they create a job request from the Please select fields that are to be displayed while adding a new request field.
- Select the corresponding Mandatory checkbox for a selected field if you want to make that field mandatory for the end user (job creator).
- Modify the field label for a field in the corresponding Label textbox, if required.
- Select the desired additional configuration options from the Additional Information field, if exists. For example, select Will be generated by Recruiter option corresponding to Job code field, if you want the job code to be specified by the job creator while creating a job request.

Figure 3
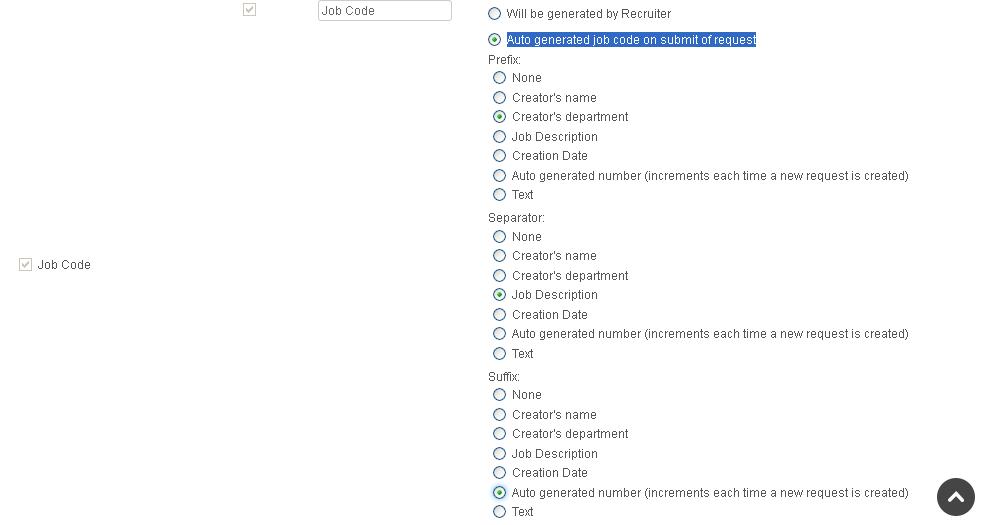
Else select Auto generated job code on submit of request option corresponding to Job Code field, if you want the job code to be automatically generated while creating a job request.
The related fields appear for the selection of prefix, separator, and suffix for the auto generated job code.
- Select the desired prefix, separator, and suffix options. The available options are:
- None : Select this option from Prefix, Separator, or Suffix fields if you don’t want to use anything for Prefix, Separator, or Suffix respectively
- Creator’s name: Select this option from Prefix, Separator, or Suffix fields if you want to use the job creator’s name for Prefix, Separator, or Suffix respectively.
- Creator’s department: Select this option from Prefix, Separator, or Suffix fields if you want to use the job creator’s department for Prefix, Separator, or Suffix respectively.
- Job Description: Select this option from Prefix, Separator, or Suffix fields if you want to use the job description for Prefix, Separator, or Suffix respectively.
- Creation Date: Select this option from Prefix, Separator, or Suffix fields if you want to use the job creation date for Prefix, Separator, or Suffix respectively.
- Auto generated number (increments each time a new request is created): Select this option from Prefix, Separator, or Suffix fields if you want to use the the auto generated number used for Prefix, Separator, or Suffix respectively to be incremented every time when a new job is created.
- Text: Select this option from Prefix, Separator, or Suffix fields if you want to use user defined text to be used for Prefix, Separator, or Suffix respectively.

Figure 4
- Select Close request automatically on the date (if provided) check box from Closing Date field if you want to close the job request automatically on the closing date if the end user has provided a closing date for a job request.
- Select the Checked option from Default Value option of External candidate option field if you want to make the job available to external candidates also. else select Unchecked option.
- Specify the maximum size for the requirement description in the Max Size field from the Requirement Details field.

Figure 5
Click Update Values button to save your settings and complete configuring request creation. Your settings are successfully updated.
Click on each of these links to know more about them:
- Add New Recruitment Request
- Publish Job
- Add and Modify a Candidate
- Search Candidates
- Add More Candidates to Shortlist
- Assign Test and Interview to Candidates
- Test and Interview Candidates and Provide Feedback
- Make Job Offer
- Configure Candidate Details
- Configure Shortlisting of Resumes
- Configure Search Setup
- Configure Job Publishing
- Configure Interview and Test


